How To Cut Tile With A Dremel
Disclosure: This post may contain affiliate links, meaning I get a commission if you decide to make a purchase through my links, at no extra cost to you.

When working with and cutting tile, you will most likely come across sections that can be hard to cut with the more conventional methods of cutting tile like a wet saw. This is where the Dremel comes in, it can be a great tool for cutting those small intricate sections that are to get access to.
To cut tile with a Dremel we use the Diamond Cutting Wheel EZ545 or the Tile Cutting Kit 566. Mark the cut, secure the tile, add water as lubrication, and start cutting with your preferred bit. The Diamond Cutting Wheel is the most effective bit for cutting tile.
Cutting tile with a Dremel can be a little bit tricky or even slow with some methods. In this article, I will go into detail and show you what gear you need to cut tile, how to do it effectively, and which methods do not work that well.
1. Prepare Dremel, Bits, Safety Gear, Tile, Water, Clamps, Pencil/Sharpie

Dremel – Use one of the more powerful Dremel models when cutting tile. I am using the Dremel 3000 and 4000. We need some power for this task. A Dremel Stylo+ simply will not cut it.
Bits – I recommend using the Diamond Cutting Wheel EZ565, it is the most effective. The Tile Cutting Bit 562 can also be used, but I find it less effective as you have to remove more material.
Safety Gear – Use a dust mask and safety glasses. Cutting tile produces a lot of dust, and your eyes should always be protected when using a Dremel.
Tile – A Dremel is best for cutting ceramic tile, which is usually softer than porcelain tile. Using a Dremel to cut the harder tiles will go very slow and does not really work out that well.
Clamps – The clamps are used to secure the tile in position so it does not move while cutting.
Pencil/Sharpie – A carpenter’s pencil or a normal sharpie works well for marking the cut.
2. Mark The Cut With A Sharpie/Pencil

We need to mark the cut so we can follow the line when we start cutting. Cutting the tile in a straight line with the Dremel is challenging enough, so the markings really help.
I prefer to use a carpenter’s pencil when marking the cut, it creates a very visible marking, it can be used on rough surfaces and water will not remove the marking.
You can also use a sharpie if you let it dry before cutting.
3. Secure The Tile With Clamps

We need to make sure that the tile does not move while cutting. Here I have clamped the tile directly onto my workbench.
Preferably we should use rubber clamps so it does not leave a mark on the tile, or break the tile. I did not have rubber clamps at my disposal while cutting this tile so I used some tissue between the clamp and tile to protect the tile.
4. Put On Safety Gear
Before we start cutting we need to put on our safety gear.
Cutting tile will generate a lot of fine dust, and we want to avoid breathing that in as much as possible. Always use a dust mask when cutting tile.
Eye protection should always be used when working with a Dremel. Bits could break or pieces of tile can shatter and come straight for your precious eyes.
For better airflow you can open a window or turn on a fan.
TIP! Wear a face shield instead of safety glasses if you have trouble with foggy glasses.
5. Choose The Right Bit For Cutting Tile

The best bit for cutting tile is the Diamond Cutting Wheel EZ545. The diamond coating is hard enough to cut through most materials and thin enough so that it does not have to remove that much material.
This makes it one of the most effective bits for cutting tile. With the Diamond Wheel, you can do both edge cuts and plunge cuts.
You can also use the Tile Cutting Bit 562 with the Cutting guide. But personally, I do not like using this for cutting tile.
It is thicker than the diamond cutting wheel which means it has to remove more material, this again means that it is harder on the Dremel and the bit and makes the cut time longer.
I also found the tile cutting bit to be hard to do plunge cuts in tile with.
The tile cutting bit is very useful for other tasks, such as cutting circles in drywall. Just not that useful for tile, in my opinion. Maybe it is better for really soft tile.
Here is a link to the Cutting Guide and Tile Cutting Bit if you still want to check it out.
6. Set Your Dremel Between 15 0000 to 25 000 RPMs
High RPMs are preferable when cutting tile. Anywhere from 15000 RPMs to 25000 RPMs should do the job.
What RPMs you use is very situational and also depends on the person using the Dremel. I almost never use the max setting of 35000 RPMs just because of the high pitch noise of the tool at that high RPM.
Don’t be afraid of experimenting with the RPMs and see what works for you
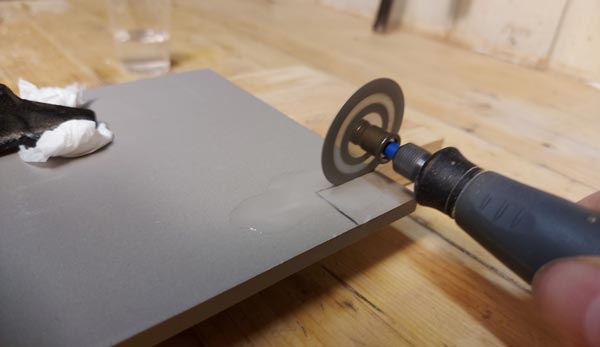
7. Cover The Cutting Area With Water
Before we start cutting the tile, it is a good idea to cover the cutting area with water. This is to cool down the cut and reduce the friction. It also helps with containing some of the dust and keeps it from flying into the air.
Cutting tile dry with a Dremel will also be harder on the bit, it will wear down faster, heat will build up and before you know it you will have to get a new bit.
You can just keep a small glass or a bottle of water beside you while you are cutting the tile.
Add water to the cut whenever you see that it is going dry.
Keep the water away from the motor and electrical parts of the Dremel. I have not found this to be a huge challenge, but it is good to be mindful of it when cutting.
To be as safe as possible I use the Dremel 4000 with the Flex Shaft Attachment (Amazon), the flex shaft attachment makes you able to place the motor far away from the water source. It is also lighter and easier to cut with.
8. Start Cutting

We are finally ready to do some cutting.
Tile is a hard material, so cutting it will be a lot slower than other materials that you might be more familiar with cutting. Like wood.
Turn on your Dremel with the diamond bit secured and carefully make contact with the tile.
Start the cut at the outer edge of the line, don’t try to cut all the way through the tile at first. Do a soft cut across the marked line, as straight as you can. We want to do several of these soft passes and slowly work our way deeper into the cut. This is the main technique we are going to use for doing the cut.
As you get deeper into the cut, the bit has a tendency to catch the edges of the tile and do a little jump. This is perfectly normal, just pay attention and keep a steady hand. The straighter the cut is, the less “jumping” you have to deal with. This also happens frequently at the edge of the tile.
9. Tips For Cutting Tile!
Let the tool do the work. Forcing too much pressure on the bit will do you no good when cutting tile. Let the tool do the work for the longevity of the bit, the Dremel, and for a cleaner cut.
You can use the Dremel to make openings in the center of the tile if you for example need it for an electrical outlet. This is a little bit harder to do compared to the cut shown in this article.
To make an opening for an electrical outlet you have to do a plunge cut into the tile. Because of the size of the tool, it often gets in the way when trying to do a plunge cut this far in on the tile.
It makes it hard to cut straight down, and you have to tilt it over to be able to plunge cut through the tile. This is not optimal.
A little attachment that will come in handy in this situation is the Right Angle Attachment (Amazon). The right-angle attachment makes the Diamond Cutting Wheel parallel to your Dremel when cutting. And gives you the ability to plunge cut straight down without having to tilt the tool.
10. Finishing Touches


When we are finished with the cut there might be some rough edges and corners where the tile has not been completely cut.
Use the same diamond cutting wheel to clean up the cut and make the edges smooth.
Now, I will not claim that this is a perfect cut, but a perfect cut is almost impossible with the Dremel. The Dremel is just great for cutting small intricate sections where it is hard to access with other tools.
I hope that this article was helpful and that it helped you do the task at hand.